While it is possible to enter your listings’ media manually, many find it easier to add their images in using the bulk import function of Partner Central.
The bulk import process will save you time with importing media, but it is crucial that you pay careful attention to the steps of the process to successfully add media to listings. The file names must follow a specific naming convention and character usage. Any bulk import that fails can be found on the page titled View Bulk Imports. Once it is corrected, resubmit the bulk import for the changes to take effect.
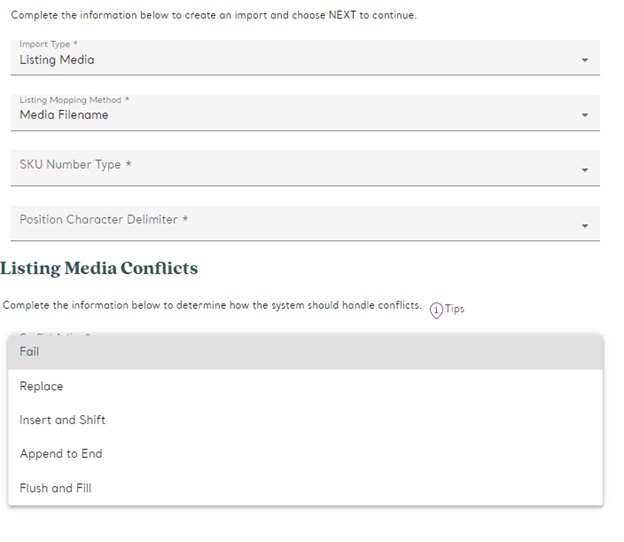
Follow the steps below to successfully bulk import media for your media listings.
First, select Bulk Import from the left navigation, then select Create Bulk Import.
Once you have selected Create Bulk Import, you will be presented with four fields to complete.
- For Import Type, select Listing Media.
- For Listing Mapping Method, select Media Filename.
- For SKU Number Type, choose to use your SKU numbers or the Jedora SKU numbers while filling out the bulk import form.
- For Position Character Delimiter, choose to use a dash or and underscore in your filenames when designating the position number.
EXAMPLE: If item ABC123 has three pictures to upload, I would list them as follows: ABC123-1, ABC123-2, ABC123-3. Doing so will inform the system the order that the photos should appear in within an item's listing.
Once your details are filled in, select Continue.
Remember to use the SKU number you selected (your own or the Jedora provided SKU) and the correct character delimiter (dash or underscore) in the filenames before you upload.
If the listing import isn't filled out correctly, you'll have several options on how to proceed.
- Fail
- If you've selected 'Fail', the Bulk Import processor will not allow the Listing Media process to complete. You will need to correct the conflicting media item to complete the bulk import.
- Replace
- If you've selected 'Replace', the Bulk Import processor will replace the conflicting media item with the new media item from the Bulk Import.
- Insert and Shift
- If you've selected 'Insert and Shift', the Bulk Import processor will insert the media item in the conflicting position and it will shift the conflicting media item, as well as any which follow, down in position to a higher position number.
EXAMPLE: If there is a conflict in Position 3, and media items exist in Position 4 and 5, then the new media item will be created in Position 3, and the media items which were previously in Positions 3, 4, and 5 shall be shifted to Positions 4, 5, and 6.
- If you've selected 'Insert and Shift', the Bulk Import processor will insert the media item in the conflicting position and it will shift the conflicting media item, as well as any which follow, down in position to a higher position number.
- Append to End
- If you've selected 'Append to End', the Bulk Import processor will append the new media item from the Bulk Import to the end of the list.
EXAMPLE: If there is a conflict in Position 3, and media items exist in Position 4 and 5, then the new media item will be created in position 6.
- If you've selected 'Append to End', the Bulk Import processor will append the new media item from the Bulk Import to the end of the list.
- Flush and Fill
- If you've selected 'Flush and Fill', the Bulk Import Processor will Delete ALL media items which exist for the Style Number, and will then create the new media items from the Bulk Import.
If you follow these steps, you will be able to upload as many images as you’d like to your listings so that customers can truly appreciate what you have to offer.